Initial setup
Below we will give a comprehensive overview of all the necessary steps to obtain consent for an SDD mandate
Obtain consent
Option 1: Use our Authorization Flow
In this section we will explain how to generate an authorization using your own SDD Creditor Identifier (CI). This will allow your company to create and use mandates using your own SDD creditor identifier. You can manage these authorizations through Digiteal. The proof of these authorizations can be retrieved at any moment.
a) Generate an authorization
An authorization request is made to Digiteal giving information about the creditor and the debtor of the mandate. Digiteal will validate the user's access to it's own bank account and validate his consent to authorize you to create and use a mandate to debit from his account.
If the IBAN of the debtor is not provided, it can be collected by Digiteal. In this case, you can collect this information through the notification (by the means of a webhook) that will be sent to you once the process is complete. This is possible because Digiteal uses AIS to verify that the user can access the bank account linked to the mandate. The user will grant this access in his bank environment, after being redirected there by us.
Here’s an example of the JSON body:
{
  "debtor": {
    "firstName": "John",
    "lastName": "Doe",
    "language": "fr-Be",
    "iban": "BE89549452327885",
    "address": {
      "streetNumber": "6",
      "streetName": "Rue Emile Francqui",
      "city": "Mont-Saint-Guibert",
      "postCode": "1435",
      "country": "BE"
    }
  },
  "creditor": {
    "vatNumber": "BE0823983002",
    "name": "Digiteal",
    "iban": "BE27646347916649",
    "sddCreditorIdentifier": "BE53ZZZ0823983002"
  },
  "mandateNumber": 23166927291572,
  "redirectUrls": {
    "successUrl": "https://success.com",
    "failureUrl": "https://failure.com",
    "errorUrl": "https://error.com",
    "cancelUrl": "https://cancel.com"
  },
  "requestId": "customReference"
}sddCreditorIdentiferis the uniform and standardized identification field used throughout Europe that identifies the creditor (Creditor Identifier).mandateNumberis a unique identifier which will act as the key for the authorization and will be used throughout the API to manage the authorization.
b) Redirect users to the authorization flow
The response from the API call from the previous section will return a url you can redirect your users to:
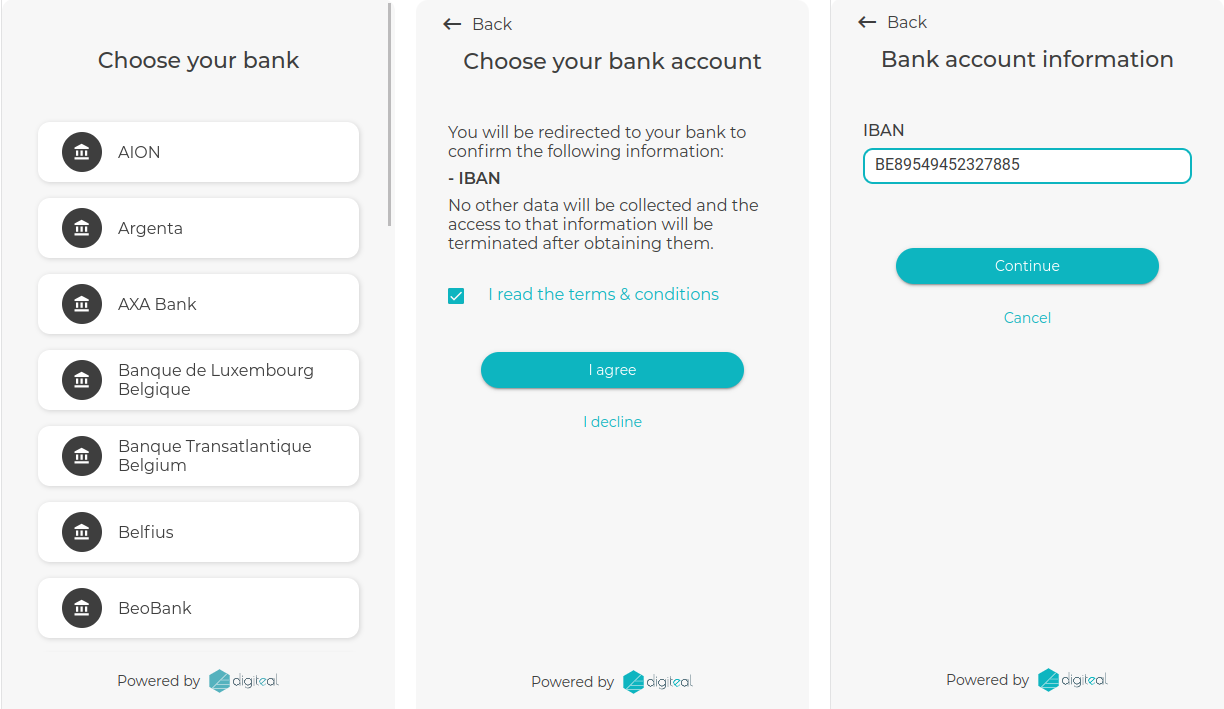
{"redirectUrl":"https://test.digiteal.eu/papi/mandates/authorizations/start/30b91693-f05a-40f8-8038-16e1d550cc53/1028"}Here the user will fill in the necessary information for authorizing the SDD mandate transfer. The first part of this process is obtaining consent for AIS. The goal here is to collect any information that could be missing. Afterwards the user is forwarded to his bank environment.

Bank selection and consent
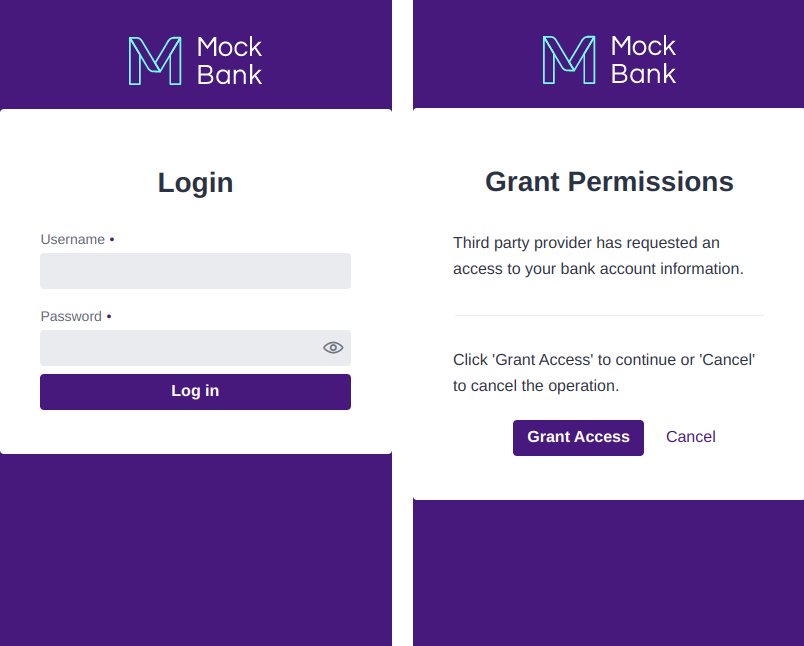
In the bank environment the user will be asked to authenticate and to accept that Digiteal accesses certain information on his account.

Bank environment
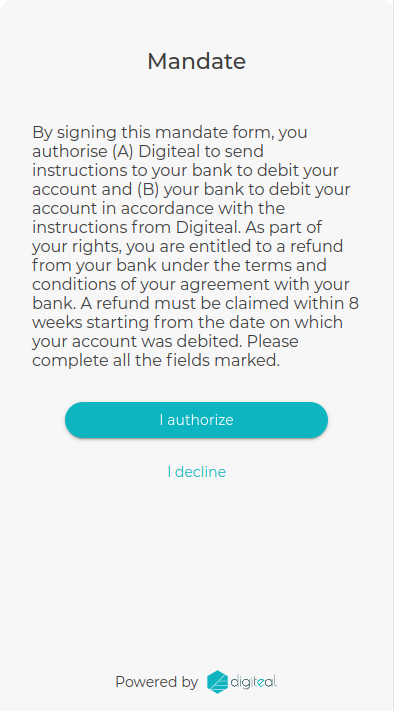
Finally the user is asked for a mandate consent. After this step, the authorization document is generated and the user is redirected to a success page or to the successUrl if defined.

Mandate consent
Once this process is successful, we will notify you through a webhook (more on that below).
Using a mock bank for testing
In TEST, you will always be redirected to the Mock Bank environment no matter which bank is selected. This allows you to test the flow without having to use real bank information. To have access to the Mock Bank bank account you must use the following credentials:
Mock Bank credentialsIBAN: BE89549452327885
username: [email protected]
password: 123tagadaM
If you wish to use IBANs from other countries, please see the complete list of credentials here
Configuring the different urls for redirection
You can define a set of redirect URL to redirect the user after completing the request flow.
URL | Description |
|---|---|
successUrl | Used in case of a successful flow. |
errorUrl | Used in case of a technical error making it impossible for the user to continue the flow. |
failureUrl | Used if the authorization could not be granted due to a problem with the user's information (ie. the user do not have access to the specified bank account). You can find details about the failure in the URL query parameter code:
|
cancelUrl | Used if the user cancel the flow. You can find details about the cancellation in the URL query parameter code:
|
Webhooks
You can subscribe to a webhook to be notified when the flow is completed. You can then retrieve the status of the request, relevant information related to that status and the collected IBAN of the debtor.
The webhook will also contain the requestId for you to link with the corresponding request.
Webhook typeMANDATE_AUTHORIZATION_STATUS
You can override the default webhook URL using the notificationUrl attribute of the request if you wish to change the default behaviour of the webhook.
notificationUrl cannot be defined without an existing webhook.
You can find the details of the webhook payload in the callback section of the request authorization endpoint.
c) Generate download link
Finally you can call an endpoint in our API to generate a temporary download link for the authorization document. This link is available for 15 min and publicly available to anyone with whom it is shared.

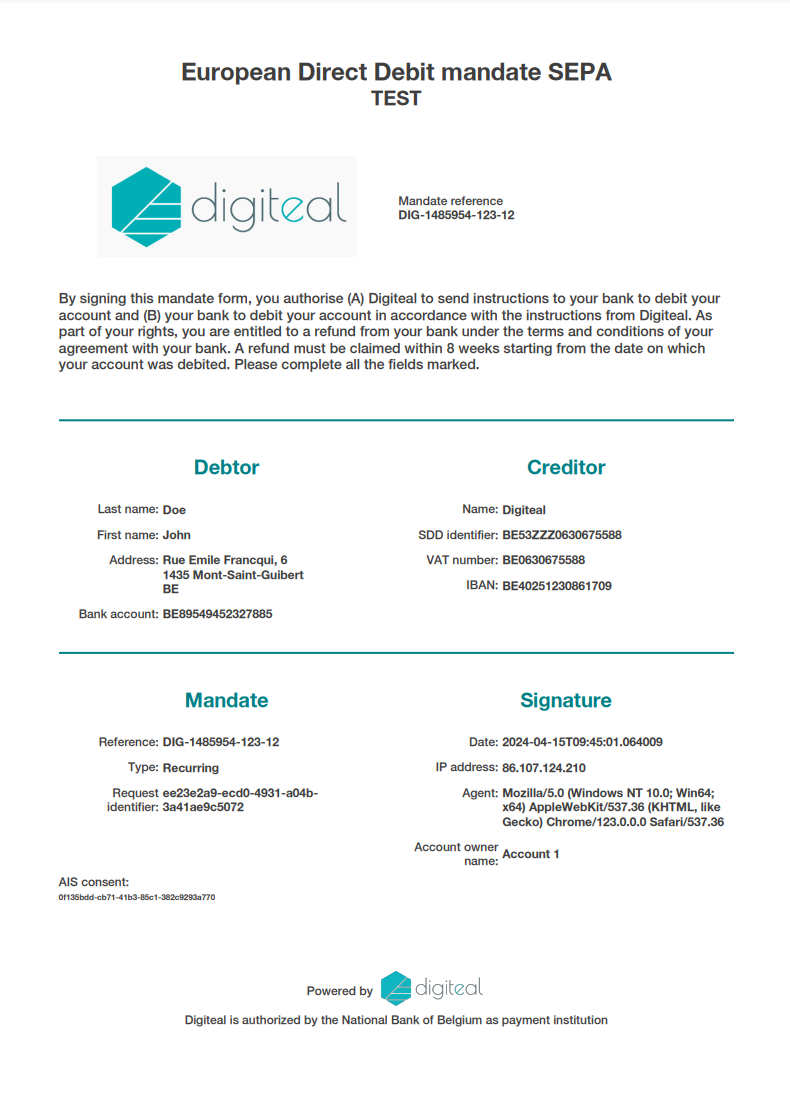
Here is an example of the document generated after a successful flow.
Delete an authorization
Once a mandate is revoked or not in use, you should clean the system by deleting the authorization . This action will remove all information about the authorization from Digiteal and delete the generated document as well.
This will come in handy later on as you will need this document as proof to complete the mandate transfer.
Option 2: Collect consent from the user directly
You can present the following (legal) agreement to your users:
en: By signing this mandate form, you authorise (A) {NAME OF MERCHANT} to send instructions to your bank to debit your account and (B) your bank to debit your account in accordance with the instructions from {NAME OF MERCHANT}. As part of your rights, you are entitled to a refund from your bank under the terms and conditions of your agreement with your bank. A refund must be claimed within 8 weeks starting from the date on which your account was debited. Please complete all the fields marked.
fr: En signant ce formulaire de mandat, vous autorisez (A) {NOM DU CREANCIER} à envoyer des instructions à votre banque pour débiter votre compte, et (B) votre banque à débiter votre compte conformément aux instructions de {NOM DU CREANCIER}. Vous bénéficiez d’un droit à remboursement par votre banque selon les conditions décrites dans la convention que vous avez passée avec elle. Toute demande de remboursement doit être présentée dans les 8 semaines suivant la date de débit de votre compte.
nl: Door ondertekening van dit formulier geeft u toestemming aan (A) {NAAM VAN INCASSANT} om doorlopende incasso-opdrachten te sturen naar uw bank om een bedrag van uw rekening af te schrijven en (B) aan uw bank om doorlopend een bedrag van uw rekening af te schrijven overeenkomstig de opdracht van {NAAM VAN INCASSANT}. Als u het niet eens bent met deze afschrijving kunt u deze laten terugboeken. Neem hiervoor binnen 8 weken na afschrijving contact opmet uw bank. Vraag uw bank naar de voorwaarden.
To perform the transfer of the mandate the following information about the user's consent is needed:
- Date of consent
- IP address
- User Agent of the user
You can add this information in the transfer mandate API call. This is especially useful when you want a quick and silent mandate transfer (i.e. no client interaction with Digiteal, more info below).
See: Transfer mandate
Option 3: Collect signed mandate document from the user
The user can obtain this document from his bank and upload it to the integrator.
Updated about 2 months ago
